Showing posts with label desserts. Show all posts

Oh, Snap

Thursday, January 13, 2011

I have a hard time referring to these cookies as “snaps.” They don’t snap. In fact, they are

Snap1deliciously chewy and quite possibly the best gingerbread cookie out there for that very  reason. And they stay soft for more than a day which, if you ask me, is a feat not many cookies can accomplish.

It’s still blustery out there (I have no right saying that. It's in the 40s here, which would probably feel like the Caribbean at this point to most of the rest of the country), so these sweet, spicy little buggers are still totally acceptable to nosh on.


If you’re wondering if this is worth buying molasses for, I would reply with a resounding “yes!” Plus, molasses lasts for, like, ever (“ever” to me being 6-8 months. Which could explain my issues with commitment. Hm.).


Chewy, Sugared Gingerbread Cookies. Oh, With White Chocolate. Why not?

makes about 2 dozen, adapted from Two Peas and Their Pod

Snaps2

1/2 cup unsalted butter, at room temperature

1/2 cup granulated sugar

1/4 cup molasses

1 tablespoon canola oil

1/2 teaspoon vanilla extract

1 1/8 teaspoons baking soda

1/2 teaspoon salt

1 teaspoon cinnamon

2 teaspoons ground cloves

1 1/2 teaspoons ground ginger

1 large eggs

1 3/4 cups all-purpose flour

3/4 cup white chocolate chunks

1 cup granulated sugar-for coating cookie dough balls. I added sprinkling sugar. I’m fun like that.

1. Preheat oven to Preheat the oven to 350°F. Line two large baking sheets with parchment papers or with a silicone baking mat. Set aside.Snaps3

2. In the bowl of a stand mixer, cream together butter and sugar until smooth and creamy.

3. Beat in the molasses, canola oil, vanilla, baking soda, salt, and spices. Mix until well combined.

4. Add the eggs, one at a time, and beat until smooth. Slowly add in the flour. Next, stir in the white chocolate chunks.

5. Scoop the dough into balls and roll in granulated sugar. Place on lined baking sheets, about two inches apart. Bake for 10 minutes, the cookies will still be soft. Remove from oven and let cookies cool on the baking sheet for five minutes. Transfer to a wire rack and cool completely.

Brown Rice Krispie Treats: Why Didn't I Think of This?!

Tuesday, February 16, 2010


By now you're probably wondering if I Pray to Gouda has turned into some weird, hippie health blog. You wonder if another, "Dang, that cheesy wonder looks amazing, I can't wait to make that" dish will appear on a blog originally dedicated to my love of God's gift from cows.

Fear not. I will whip up artery-clogging life-shorteners soon enough. I mean, shoot - I ate onion rings and chocolate chip cookies for dinner tonight. (Judge not, my friend.) But - at this venture, I'm busy introducing as many healthy products and wholesome alternatives into my life so that the not-so-wholesome foods will compliment my diet rather than fully comprise it.

Ya get what I'm throwin' down, yo?

Here's my promise, though: I love food. More than a lot of people. So I'm never going to put a recipe on here that I don't find absolutely deeelicious and think you should try, too.

On that note, introduce some wholesomeness into your life via the new and improved rice krispie treat.

Brown Rice Krispie Treats
whipped up by my bud, Jennifer


3 Tb vegan margarine (such as Earth Balance) - if you don't want to go vegan, use regular butta'.

1 package Dandie's Vegan Vanilla Marshmallows (yums. I swear.)

6 cups brown rice crisps cereal (we used Barbara's. Love that lady.)

Melt butter in a large saucepan over low heat. Stir in marshmallows. Add in rice crisps and stir until coated. Using wax paper or a greased spatula, press this mixture into a 9x13 baking dish. Cool, cut and nosh.

Super-Charge Me Cookies!

Oh, they live up to their name, too. Even the boyfriend, Mr. I-Only-Love-Butter-Filled-Chocolate-Chip-Cookies agreed that they were "good for a healthy cookie."

Folks, these are just plain good, regardless of whether you're trying to be healthy or not. No butter (replaced with all-natural peanut butter and a bit of canola oil). No white sugar (used 100% maple syrup, instead). If you have kids (or if you're a kid at heart), these are an awesome alternative to a sugar and artificial ingredient-laden cookie.

The Super-Charge Me cookie is filled with nutrition: spelt flour* (the "grandfather" grain to wheat; huge source of protein, B2, manganese and a crapload of other good stuff); dried cherries, unsweetened coconut and flax. I used dark chocolate chips, but you can use carob chips or milk chocolate and then add whatever dried fruit your cute little heart desires.

Warning: you're gonna eat a whole lot o'these.

Super-Charge Me Cookies
modifed from the original at Eat, Drink and Be Vegan
Makes 11-15 cookies

1 cup quick oats
2/3 cup spelt flour
1/4 tsp (rounded) sea salt
1/8tsp cinnamon
1/8 cup unsweetened shredded coconut
1/4 dried cherries
5 Tb carob or chocolate chips (optional; or use more dried fruit, nuts, or seeds)
1 tsp baking powder
1/3 cup flax meal (not flax seed)
1/2 cup pure maple syrup
3 tbsp peanut butter (no sugar added!)
1 1/2 tsp pure vanilla extract
2 tbsp organic canola oil

Preheat oven to 350°F.

In a bowl, combine oats, flour, salt, cinnamon, coconut, cherries, and carob or chocolate chips, sift in baking powder, and stir until well combined.

In a separate bowl, combine flax meal, syrup, peanut butter butter, and vanilla and stir until well combined. Stir in oil. Add wet mixture to dry, and stir until just well combined (do not overmix). Line a baking sheet with parchment paper. Spoon batter onto baking sheet evenly space apart, and lightly flatten. Bake for 13 minutes (no longer, or they will dry out). Remove from oven and let cool on baking sheet for 1 minute (no longer), then transfer to a cooling rack.

*Spelt flour can be found at Whole Foods and Nugget Stores. Or any health food store.

With a Name Like Curd...

Saturday, September 26, 2009

Why in the world would they name such a wondrous, lemony, smooth gift from God, "CURD"?

Regardless...a coworker's birthday was dawning and the usual gift card was not in my repertoire. (Not that I mind getting gift cards. Just a quick FYI, there). So, I decided to whip up something, package it in a supercute manner and hand it off to the recipient.

Yeah, so. Hand-juicing and meticulously zesting, then straining 19 lemons? Doesn't quite fit into the "whip up" category. I've never cooked something and then had sore wrists and biceps for days thereafter. On a positive note, as readers of I Pray to Gouda, you all now have free, all access tickets to my gun show. :: flex ::

Homemade Lemon Curd

*"What the heck do I do with it, Faith?"

* Top scones, pancakes, stir into plain yogurt and crepes and whipped cream, english muffins...or pull a Faith and eat it off a spoon.

2 cups sugar
4 large eggs, plus 4 large egg yolks, beaten
1/4 cup finely grated lemon peel
1 cup fresh lemon juice (approximately 1 hour later - check out your awesome, toned arms in mirror)
1 1/2 sticks unsalted butter, cut into pieces

1. Set a fine-mesh strainer over a medium, heatproof bowl next to stove. In a heavy, medium saucepan, whisk together the sugar, lemon juice, eggs, egg yolks and lemon peel. Add butter, cook over medium-low heat, stirring constantly (about 5 minutes).

2. Lower heat and simmer. Sitr until mixture thickens (another 5 minutes). Strain mixture into prepared bowl, then press a sheet of plastic wrap directly onto surface. Let cool to room temperature. Transfer to an airtight container and refrigerate for up to 1 month.

Hurry! Before It's Too LATE!

Friday, September 25, 2009

Because blueberries are about to head right out of season, yo. Actually, with the way temps are going here in California (um, hot with a side of HOT), blueberries may well be part of the produce sections around here through December. I'm quite over this non-autumn weather we're having. But I'm not sure who to yell at for it.

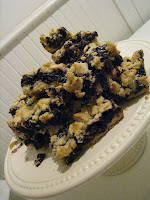
These blueberry crumble bars are OUTSTANDING. Like - crazy goodness in yer mouth. I made them for a movie night my neighbors and I had (my neighbors? Well, they're the best. I've got two rad school psychologists next door, a sweet, funny plastic surgeon [holllaa!] upstairs who has a supah-hilarious criminal psychiatrist friend who's over a whole heck of a lot, and a majorly kind, cute, 30 year old guy
across the street. Before you go leaving comments about how the two of us should totally, like, date...everything is under control.)

What was ridiculously cool about this movie night is that it was outside and we used a projector to splat the movie right onto the side of the house. Yes.

Blueberry Crumble Bars
courtesy of Smitten Kitchen (congrats on the baby, Deb!)

{Makes roughly 36 smallish rectangles}

1 cup white sugar
1 teaspoon baking powder
3 cups all-purpose flour

1 cup cold unsalted butter (2 sticks or 8 ounces)
1 egg
1/4 teaspoon salt
Zest and juice of one lemon
4 cups fresh blueberries
1/2 cup white sugar
4 teaspoons cornstarch

1. Preheat the oven to 375 degrees F (190 degrees C). Grease a 9×13 inch pan.
2. In a medium bowl, stir together 1 cup sugar, 3 cups flour, and baking powder. Mix in salt and lemon zest. Use a fork or pastry cutter to blend in the butter and egg. Dough will be crumbly. Pat half of dough into the prepared pan.
3. In another bowl, stir together the sugar, cornstarch and lemon juice. Gently mix in the blueberries. Sprinkle the blueberry mixture evenly over the crust. Crumble remaining dough over the berry layer.
4. Bake in preheated oven for 45 minutes, or until top is slightly brown.
Cool completely before cutting into squares.

Dairy-Free Chocolate Cake with Peanut Butter Frosting

Friday, December 26, 2008

Sounds weird, doesn't it? Can't say I blame you. Eric and I were pretty wary of this idea, ourselves. A cake with no eggs? Or milk? That's just crazy. But a good friend stopped by for a Christmas Day visit and it was time to get creative. And while creativity doesn't always come easily to me, it's always a fun adventure.

And oh, SO good. This recipe was passed on to me by a friend of mine who explained it as a cake often served during the Depression era due to ingredient rationing. We Americans sometimes forget how easy we have it these days!

Put a little spice in your life and shake things up a bit. Try out this vegan and delectable recipe. Your friends will never know.

Vegan Chocolate Cake with Peanut Butter Icing

Mix until smooth:

1/2 cup vegetable oil
1 cup strong, brewed coffee
2 teaspoons vanilla

Into the wet ingredients, fold the following:

1 1/2 cups flour
1/3 cup unsweetened cocoa powder
1 teaspoon baking soda
1/2 teaspoon salt
1 cup sugar

Quickly mix in 2 teaspoons of vinegar and pour into a greased and floured cake pan. Bake for at least 25 minutes at 375 degrees.When the cake is cool, frost with:

Peanut Butter Frosting

Mix together at medium speed:

1/2 cup peanut butter
1/2 cup non-dairy margarine
2 cups confectioners sugar (or more if you like it sweeter)
pinch salt
4 teaspoons soy milk
1 oz dark chocolate, chopped or shaved

Posted by Picasa

'Twas the Night Before Christmas...

Wednesday, December 24, 2008

And all through the home...

Faith's OCD was kicking in as she frosted the carrot-cakey dome...

I decided to do part of my menu tonight, seeing as I didn't want to hang myself by the Christmas lights tomorrow due to taking on way too much kitchen time. I baked and frosted during the 17 Kids and Counting commercials while simultaneously watching How the Grinch Stole Christmas (Jim Carrey-style) and blasting Christmas music in my breakfast nook. Eric took it quite well. Haven't heard one complaint. Most likely because I baked his most favorite kind of dessert AND let him lick the whisk.

I, myself, don't love carrot cake. Amazingly, this one may have swayed me to the dark side. The cake is light and spongy, but the cream cheesy frosting we all know 'n love has a hint of pure maple syrup and truly steals the show.

Carrot Cake with Maple Cream Cheese Frosting
courtesy of Smitten Kitchen

Makes one 2-layer cake

2 cups all purpose flour
2 teaspoons baking soda
1 teaspoon salt
2 teaspoons ground cinnamon
1/2 teaspoon ground nutmeg
1 teaspoon ground ginger
2 cups sugar
1 1/4 cups canola oil
4 large eggs
3 cups grated, peeled carrots
1 cups coarsely chopped walnuts (optional)
1/2 cup raisins (optional) - um. I left these out. The only way I like raisins is in the box in which they came.

Preheat oven to 350F.

Butter two 9" cake pans. Line bottoms of pans with waxed paper (truly important!). Butter and flour paper, then tap out excess flour.

Whisk flour, baking soda, salt, cinnamon, nutmeg and ginger in medium bowl to blend. Whisk sugar and oil in large bowl until well blended. Whisk in eggs 1 at a time. Add flour mixture and stir until blended. Stir in carrots, walnuts and raisins, if using them. Divide batter among cupcake molds, filling 3/4 of each.

Divide the batter between the prepared pans, and bake the layers for about 40 minutes each, or until a tester inserted into center comes out clean. Cool cakes in pans 15 minutes. Turn out onto racks. Peel off waxed paper; cool cakes completely.

Maple Cream Cheese Frosting

Two (8-ounce) packages cream cheese, softened
1 stick unsalted butter, room temperature
2 cups confectioners’ sugar
1/4 cup pure maple syrup

In a stand mixer beat all the ingredients on medium until fluffy. Chill the frosting for 10 to 20 minutes, until it has set up enough to spread.

Frost the top of one cake, place the other cake on top. Frost the sides and top, swirling decoratively. Refrigerate the cake for 30 minutes to set up frosting.